On TRYTN, there are multiple methods that can be utilized to check a participant into their activity. The following article describes the process for each of these methods.
This article covers the following topics:
- Check Participant In from your TRYTN Account
- Check Participant in via QR Code
- Undo a Check-In
- View or Print Transaction Receipt
- View or Print Participant Tickets
Check Participant In from your TRYTN Account
From your TRYTN account, participants can be checked in via the Transactions - Details screen or the Manifest screen. There are a few options for navigating to check-in pages. Instructions for each of these options are detailed below:
STEP 1: Log in to your TRYTN account.
STEP 2: Select one of the options below to navigate to locate the check-in for your participant:
OPTION 1: Via Dashboard
To check in a participant from your account Dashboard, select Dashboard from the main website navigation. Find and click on the activity for the transaction of interest on the dashboard calendar.
Next, select the transaction time slot.
Once you find the transaction you're looking for, select the associated Details button.
From the Transactions - Details screen, click the blue Actions menu button and select Check In.
Once Check In is selected, the participant status will be indicated as "Checked In" on the following screen's manifest list, both at the transaction level and at the participant level.
Note: From the Actions menu, you also have the option to view Details of the transaction, and view or print a copy of the transaction Receipt or participant Tickets.
OPTION 2: Via Check In Page
To check in a participant from the main Check In page, select Check In from the main website navigation. On the Check In page, enter the search parameters for the transaction and click the blue Search button. Additional search filters can be selected, if needed, by clicking on the blue Filters button.
All applicable activities will show up as results listed in blocks based on the scheduled start time, see example below.
Simply click on the applicable activity to view the Manifest page where you will see a table with the number of booked participants, the capacity for the activity, and the number of participants who have been checked in. You will also find a list of all transactions for the activity, including the number of participants booked for each transaction.
To check in a participant, select the Actions menu for the transaction and click Check in this group.
At this point, participant status will be indicated as "Checked In" on the manifest list both at the transaction level and at the participant level.
Note: From the Actions menu, you also have the option to view Details of the transaction, and view or print a copy of the transaction Receipt or participant Tickets.
OPTION 3: Via Transaction Details Page
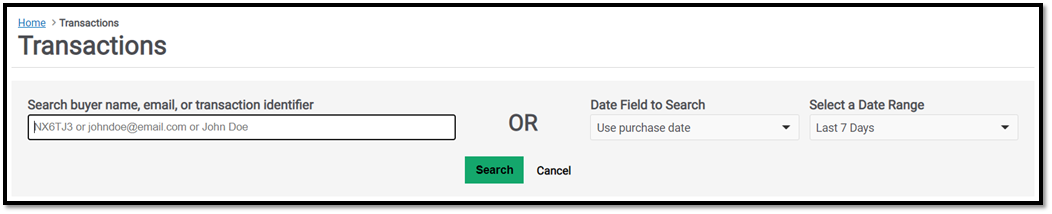
To check in a participant from the Transaction Details page, select Transactions from the main website navigation. On the Transactions page, enter the search parameters for the transaction and click the green Search button.
To check in a participant, select the Actions menu for the transaction and click Check in this group.
At this point, participant status will be indicated as "Checked In" on the manifest list both at the transaction level and at the participant level.
Note: From the Actions menu, you also have the option to view Details of the transaction, and view or print a copy of the transaction Receipt or participant Tickets.
Check Participant in via QR Code
When the 'Emailed Tickets' feature is enabled via the features page the customer receives a ticket with a QR code along with the buyer confirmation email. Using any device with a camera you can use the Scan Tickets functionality to simply scan the QR Code on the participant's ticket to check them in quickly. The participant's status will be shown as "Checked In" on the Transactions - Details screen and on the activity Manifest page.
When you click Scan Tickets the first time you will need to give the page access to your device's camera. From there you simply place the QR code into the camera's aiming square and the scan will automatically occur. From this page you also have the options to 'Toggle Camera Flash' and 'Stop Scanning Tickets'.
When a ticket is successfully checked in you will hear a success tone, assuming you have some sort of speaker attached, and be displayed a success message. After you have heard/seen this you can continue scanning other tickets.
When a scanned ticket fails the check in process you will hear a failure tone, again assuming you have some sort of speaker attached, and be displayed a message with the reason.
Note: Only emailed tickets include a QR code. To enable emailed tickets for your transactions, go to Settings > Features and check the box labeled Emailed Tickets under Functionality Settings. Unfortunately, the success or failure sounds will not work with Apple products do to a recent operating system change they made.

Undo a Check-In
If a participant is marked as "checked-in" and you need to undo this action, start by navigating to the Manifest screen for your activity. To do this, follow the simple steps below.
STEP 1: Log in to your TRYTN account and select Check In from the main site navigation.
STEP 2: Enter your search parameters on the Check In page using one of the methods below:
Search by buyer name, email, or transaction identifier
Enter any known information into the search field and click the green Search button. Next, locate the transaction of interest from the results list and click the associated Actions menu, followed by Check In.
Search by date and/or activity title
Enter the date and/or a keyword from the activity title into the respective search field. Then, locate and click on the activity of interest, based on start time.
STEP 3: From here, you will see the Manifest screen, which shows a list of all participants for the activity, as well as noting each participant's check-in status.
Simply locate the participant whose status needs to be changed from "Checked-In" and click the associated Actions menu, followed by Undo Check In.
You will see the "Checked In" status has been removed, as illustrated in the example below where we have indicated the second participant on the transaction has not yet checked in.
View or Print Transaction Receipt
To access the receipt for a particular transaction, follow the simple steps below:
STEP 1: Log in to your TRYTN account and select Transactions from the main site navigation.
STEP 2: Enter your search parameters on the Transactions page and click the green Search button.
This will provide a screen with the transaction receipt (example shown below).
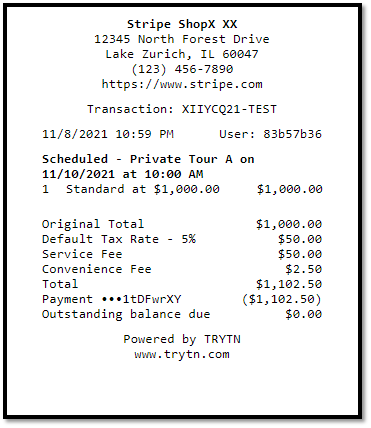
To save or print this receipt, simply right-click the receipt and click Save As or Print.
View or Print Tickets
To access the tickets for a particular participant or transaction, follow the simple steps below:
STEP 1: Log in to your TRYTN account and select Transactions from the main site navigation.
STEP 2: Enter your search parameters on the Transactions page and click the green Search button.
This will provide a screen with the transaction ticket(s) (example shown below).
To save or print the ticket(s), simply right-click the receipt and click Save As or Print.