It's simple to manually add a reservation to the system from your TRYTN account. For each transaction you have the ability to enter participant details, process payments, add notes or payment tags, assign affiliates for commission, and send emails confirming reservations.
This article covers the following topic:
Related Articles:
- Send Customer an Invoice
- View Detailed Transaction Information
- Edit an Existing Purchase
- Reschedule an Existing Reservation
Enter a New Transaction
To manually add a reservation, log into your TRYTN account and select New Transaction from the main navigation menu.
STEP 1: Find Your Product
From the New Transaction screen, there are several options to help you access your shop's various offerings. An explanation for using each of these options is provided below.
Product Tabs - Click on a tab at the top of the page to filter results based on your shop's product types.
Search - Click the 'Filters' button and enter a search term or use one of the other filter options.
Views - Choose how product results are displayed by selecting grid or date view.
-
-
-
-
Using Grid View, you can choose your desired offering by simply clicking on the image, or by selecting More Details.
Using Date View, you can use the arrows to scroll through dates one week at a time, or you can access activities for a specific date by clicking the calendar icon. This will display a calendar view so you can identify the exact date of interest (see images below).
-
-
-
Scroll Dates by Week
Use Calendar to Find a Specific Date
STEP 2: Select Activity Details
From the activity Details Page, complete the following:
- Click on the desired date and corresponding time slot that you wish to manually reserve.
- Select the number of participants using the dropdown menu.
- Click Add to Cart.
STEP 3: Complete Participant Information
On the Checkout screen, complete the reservation process by entering the following information for each participant included on the transaction:
- Participant Names
- Responses to Participant Questions
- Applicable add-ons
When finished, click Review & Checkout to continue.
STEP 4: Determine Payment Collection Method
On the Review screen, you can choose how you want to process the reservation:
Regular - Collect payment now: This option makes the reservation and allows for the processing of the credit card payment directly through the TRYTN platform with your linked payment processor account. If selected, Billing Information must be completed, as well.
Reader - Collect payment now via card reader: This option makes the reservation and allows for processing of the credit card payment directly through your Stripe Terminal Credit Card reader/s with your linked payment processor account. If selected, the preferred reader can be selected from the dropdown menu provided.

Invoice - Customer pays later: This option automatically sends an email to the customer with an invoice link. Note that the customer has not reserved their place until they finalize payment through the invoice link. See our article titled Send Customer an Invoice to learn more about this functionality.
Pay with Cash: This option must be processed separately, however, when the customer pays by cash their space in the activity is reserved.
Other: This option makes the reservation with no money being processed. The space is reserved.
Tax Exempt Purchase: Select this checkbox to indicate a purchase that is exempt from taxes or fees.
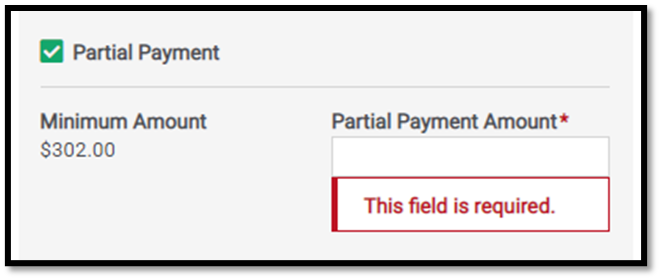
Partial Payment: Select this checkbox to enter a partial payment amount. The outstanding balance will be automatically calculated and displayed as this section is updated.
Note: The minimum amount required for a partial payment is 2x the service fee.
STEP 5: Enter Buyer Information
Under the Buyer Information section, enter the name, email, country, phone number and preferred language for the buyer.
STEP 6: Enter Billing Information
Under the Buyer Information section, enter the name, email, country, phone number and preferred language for the buyer.
STEP 7: Complete Transaction Details
Fill in any final pieces of information necessary for your transaction in the bottom portion of the form.
Affiliate: If preferred, the dropdown menu can be used to select an affiliate to assign commission for the transaction. Note: To add an affiliate that is not currently listed, navigate to Affiliates - Create and enter the affiliate name and commission rules. Then save changes to add the new affiliate on your transaction.
Internal Notes: Transaction-related notes can be added to the open field if needed.
Payment Tags: Payment tags can be selected by clicking into the field and choosing from the list of tags created for your account. Note: To create a new payment tag, navigate to Payment Tags - Create and enter the name of the new tag. Then save changes to utilize the new payment tag on your transaction.
Send Confirmation Emails: When this checkbox is selected, a confirmation email will automatically be sent to the provided email address once changes are saved (via the Complete Transaction button).
*Note: If this box is not checked there will not be a confirmation sent to the customer or to the shop. In turn, there will also be no "communications" tab on the Transaction Details page. If you'd like to send a confirmation email, you can do so by clicking on Actions > Communications > Resend Confirmation Emails.
STEP 8: Complete Transaction
When all transaction details have been reviewed and finalized, click the green Complete Transaction button at the bottom of the screen to confirm the transaction. If the Send Confirmation Emails checkbox has been selected, the customer will receive an automatic email at this time.